The average personal computer is a security nightmare, but what if i were to tell you there was a way around this, a way to make windows secure? VPNs, proxies and TOR only get you so far, but what do you do when they’ve traced it to your computer?
Anti-forensics is designed for this situation, to prevent them from proving you’ve done anything wrong even if they have your computer, its the art of leaving no trace, it is combating common forensic tools in preventing any penetration for forensic tests on your computer.
Anti-forensics can pretty much be summed up in one famous quote:
Make it hard for them to find you, and impossible for them to prove they’ve found you
– Scott Berinato.
This article will teach you everything you need to know about anti-forensics to protect you and your privacy.
1) Disabling Time Stamps
Using Time Stamps, Forensic Experts can build a “Digital Time-Line”, this can be very compelling evidence when cross referenced with other known evidence. In order to strengthen security, we must disable these logs.
a) User Assist File
In the windows registry, there are settings that store logs and there respective dates of all launched programs, forensic experts can use this information to construct a digital time-line of your activity on the computer, disabling these settings is a key aspect of anti-forensics.
HKEY_Current_User\Software\Microsoft\Windows\CurrentVersion\Explorer\UserAssist
You should see two sub-keys called “Count”, delete both these keys, Now right click the UserAssist Key and Create a new key named “Settings”, In this key create “DWORD” value named “NoLog”, and set the value to 1.
Windows will no longer store logs of your activity.
b) Last Access Logs
Next we’ll disable the last access in windows. What last access is a setting on windows that allows you to see when you opened, modified, and/or created files on your computer and is similar to the “UserAssist” registry key. By disabling this forensic experts won’t as easily be able to tell when you’ve been accessing programs or files on your computer.
To disable last access, open CMD on your computer, and type the following command,
fsutil behavior set disablelastaccess 1
After typing this command, please restart your system and make sure that you’ve to use CMD as a administrator.

2) Encrypting Your Computer
It is very important to make sure that your computer is encrypted, in the case an unwanted visitor is trying to access your computer, they will not be able to access to computer if it is encrypted.
Step 1 – TRUECRYPT
To encrypt your computer, you can use Truecrypt, a free program that allow you to encrypt your computer. When encrypting with this tool, you have two options – the first one is to create a hidden container, A hidden container is an OS that is impossible prove exists.
When creating a hidden container you’ll have 3 different passwords.
- The first would be for your decoy system, the OS you would show someone forcing you to login your computer.
- The second password would be for your outer volume, the OS you would show someone forcing you to login to the second partition on your computer.
- Third password is for the hidden OS on the second partition of your computer, this OS is placed in the inner volume, and is impossible to prove exists.
The 2nd Option is just encrypt your HARD-DRIVE. This is also very secure, but you may be forced to give up your password due to court-order; in this situation many would think to simply say that they forgot their password, but doing so could get you held in contempt of court. With normal drive encryption, your computer is just as secure “Encryption Wise” and you’ll have a single password.
For more info, you can even visit their official website.

Step 2 – Encrypt Your Keystrokes
It is imperative that you protect yourself from keyloggers, hackers will use these to steal log-in information and credit cards, the government uses keyloggers to spy on you. A few years ago, there was a lot of speculation about “CIPAV”, a government owned/coded piece of spyware, which would record the victim’s IP address, MAC address, open ports, operating system, installed applications, default web browser, time and date of log-ins, visited URLs, download history, and most critically, aLL typed keystrokes (that means all your accounts log-in information, credit cards, personal emails, everything). CIPAV was a huge invasion of privacy, and should serve as a reminder that you can never be too careful.

Encrypting your keystrokes is an excellent technique to protect yourself from keyloggers, it renders any tracking of typed keystrokes completely useless.
Keyscrambler is a program which can do just that, encrypting all keystrokes sent to a variety of popular applications; its premium version supports 170+ programs, though it is not free, and costs a hefty $45, you can alternatively use the free version, but it is obsolete when compared to the premium.
3) Making Encryption Secure
Encryption is pointless if it can be easily bypassed or overcome. You need to make sure that the encryption is secure too.
Step 1 – Make Sure Your Password Is Strong
Even with your computer encrypted, it is still vulnerable. Make sure your password is good (for optimal security, your password should be twenty or more characters, with symbols, numbers, and random capitals, and a special symbol (eg, ALT+1456) really increase security).
If you password is not strong enough, you can change it by right clicking your encrypted drive in TrueCrypt and selecting ‘Change Password’.
Step 2 – Create A Locked Screen Saver
Encryption is pointless if the feds get to your computer while its running. They can use live forensic tools that don’t require the movement or shutdown of a computer. A very simple technique to overcome this is to create a locked screen saver.
To create a locked screen saver in Windows Vista or Windows 7;
Right click your desktop and click on “Personalize”. In the bottom left hand corner you should see “Screen Saver” click that. Now, check “On Resume Display Log-on Screen”, and set “Wait” to 5.
Now you must go to your Control Panel. Click on “System and Security” now click on “Power Options” find your selected plan and click “Change plan settings”; now, set “Turn Of Display” to “5 minutes”.
Step 3 – Get A Good Anti-Virus
This may seem obvious, but all this is pointless if you get infected with a keylogger that takes screen shots. Having a good anti-virus is one of the most important things you can do. Many people make the mistake of having a poor anti-virus; AVG, Norton, McAfee, all are awful anti-viruses. The only anti-virus programs I find worthy of my recommendation are ESET Nod32, Kaspersky, and BitDefender, these anti-viruses are very good, but quality comes with a price-tag and you might find them a bit too expensive for your taste.

4) Disable and Remove USB Logs
Next on the list of Anti-Forensics in to disable logs of USB activity, flash drives, etc… This can be valuable if you have a flash drive with sensitive data and you don’t want any logs of it ever being plugged it to your computer.
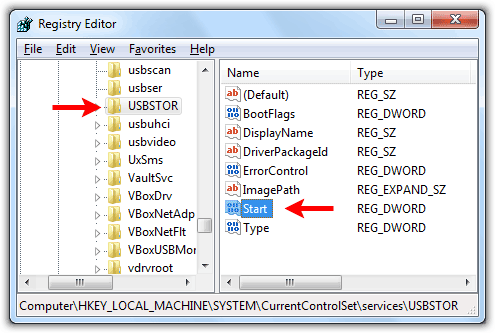
Step 1 – Delete the USBSTOR Registry Setting
In your registry, there is a key called “USBSTOR”, which logs all information on USB devices interpreted by your computer; brand name and model, size of the device, date and time pluxed in, etc..
Forensic experts can and will use this to match your computer to USB devices.
Deleting this registry key is not as simple as most others, it has special permissions that can be hard to bypass. To delete this key, we will use a tool from Microsoft called “PsExec“.
Once you have it downloaded, extract the RAR file to your desktop. Open up Command Prompt (as Administrator) and type the following into the command line;
cd C:\Users\%Username%\Desktop\PsExec
This will cause Command Prompt to navigate to your desktop, once this is done type the following into the command line;
psexec -i -d -s c:\windows\regedit.exe
The Regstry Editor window will open, with full permissions. Browse to the following directory
HKEY_LOCAL_MACHINE\System\CurrentControlSet\Enum\USBSTOR
Now, right click “USBSTOR” and hit ‘Delete’, then confirm that you want to delete the key, congratulations- the key has been deleted.

Step 2 – Delete The Setupapi.log File
The Setuppapi log is a plain-text file that stores the list of installed USB devices and their drivers. We will delete it with a program called “CCleaner”.
CCleaner is actually one of the best tools that anti-forensic has to offer, it does a great job of securely wiping files (assuming you have it set to delete securely), for specific instructions, see the “Wipe With CCleaner” section of the guide.
5) Windows Security Misc.
This section is for various information that is important to anti-forensics, but isn’t quite big enough to have its own section within the article.
Step 1 – Disable System Restore Points
System Restore points can be used to bring your computer back to a date when it wasn’t secure and can also be used to restore overwritten files.
To disable System Restore points, right click “Computer” and click “Properties”, Now click “Advanced System Settings” Under “System Protection”, click “Configure Now”
Select Turn Off System Protection and apply it.
Step 2 – Disable Send Error Report to Microsoft
This is self-explanatory, we obviously don’t want Microsoft having logs of all our crashed programs.
To do this, go to your start menu and search ‘problem reporting settings’ and then click on ‘Choose How To Report Problems’. Click ‘Change Report Settings For All Users’ and then set it to ‘Never check for solutions’.
Step 3 – Wipe With CCleaner
This is the heart of Anti-Forensics right here. CCleaner is actually one of the most powerful Anti-Forensic tools, IF used correctly.
As it turns out, when deleting files, you DO NOT need to do multiple overwrites. With modern hard-drives, one overwrite really is enough to delete a file beyond repair, even though it is popular belief that you need several overwrites to be secure. With CCleaner, I would recommend two overwrites, just in-case it misses something the first time around (remember, it freeware).

Once you have CCleaner installed, run it (as administrator), go to Settings and make sure you have it set to overwrite deleted data with three passes.
Go back to Cleaner and check everything then hit Run Cleaner. You might want to leave this on overnight depending on how many files it has to clean.
Do this every time you are done with a major hacking job. When using CCleaner normally (what should be every time you are done with your computer), uncheck Wipe Free Space this will cut down the time from hours to a few minutes.
Step 4 – Disable Debugging Upon Failure
This keeps logs of your computers failures and blue screen info. To disable it, right click Computerand go to “Advanced System Settings”, now go to “Start Up and Recovery” None, set Debugging Information to None.
Step 5 – Disable Windows Event Logging
Windows keeps logs of all events on the computer. First, before we disable, we must clear all the logs.
To disable it, go to Control Panel then System and Security. Now, click Administrative Tools, and then Event Viewer. In either pane of the Event Viewer window, right-click System and then select Clear All Events, click No to the dialog box that will open.
Now we must disable Windows Event Logging. Go to Run and type in “msconfig” then go to ‘Services’ and make sure ‘Hide all Microsoft Services’ is unchecked. Now scroll down until you find Windows Event Logging, and uncheck it.
Now restart your computer right away.
Step 6 – Disable Windows Hibernation
You may as well hand your computer over to the feds if they raid your house and your computer is in hibernation. Also, putting your computer into hibernation is pretty much just taking a screen shot of your RAM that gets saved to your hard drive.
Open your Control Panel. Click System and Security, then click ‘Power Options’, Click ‘Change plan settings’ for you current power plan.
Now click “Change advanced power settings” Expand “Sleep” then expand “Hibernate After” Enter 0 for Setting
Hibernation is now disabled.
Step 7 – Disable Stand By In Registry
Disabling standby is necessary for the same reasons that disabling hibernation is. For this step, I have prepared a pre-written code;
HKEY_LOCAL_MACHINE\SYSTEM\CurrentControlSet\Services\ACPI\Parameter…
Simply create a new text file on your desktop, paste the above code in it, and save it has standby.reg then double click the .regfile and click Ok to dialog box that will appear.
…All Credit Goes to r00t3r[dot]com (Saurfang)
You may also like:
- CTEM – A Strategic Approach to Mitigating Cyber Risks
- AI in Penetration Testing – Revolutionizing Security Assessments
- Protecting Your Organization from AI-Enhanced Social Engineering Attacks
- The Rise of AI-Powered Cyber Attacks in 2025
- Top 5 Penetration Testing Methodologies to Follow in 2025
- Top 10 Penetration Testing Tools Every Security Professional Should Know in 2025
- Emerging Trends in Vulnerability Assessment and Penetration Testing (VAPT) for 2025
- The Role of Cybersecurity in Protecting IoT Devices in 2025
- Understanding the Five Phases of Penetration Testing
- Top 20 Cybersecurity Career Options


