As you all knows, Kali Linux is one of the most popular penetration testing OS with more than 1000s of hacking tools pre-installed in it like Metasploit Framework, Air-crack Package for Wireless Cracking, various Network Scanning Tools, Web Application Scanning Tools like wpscan, joomscan etc.
In this article, you’ll learn a complete installation of Kali Linux machine on AWS Server with free public IP. There are so many tutorials on internet to learn Kali Linux but all are with Virtual Machine where you can’t get any public IP and you can’t do anything outside the local network. So the best method is to run Kali Linux on cloud i.e. on AWS (Amazon Web Server).
Let’s start it by creating a free account on AWS by clicking this link.

The Amazon Web Services (AWS) Free Tier is designed to enable you to get hands-on experience with AWS Cloud Services. The AWS Free Tier includes services with a free tier available for 12 months following your AWS sign-up date, as well as additional service offers that do not automatically expire at the end of your 12 month AWS Free Tier term.

After filling correct email, it will ask further payment details where they will charge around 2 INR which is around 0.03$ USD. After filling all correct details, they will also ask for mobile verification which doesn’t take so much time to verify.

Immediately, they will activate your account and you’ll get instant email confirmation regarding your account setup.

By signing into AWS, just click on LAUNCH A VIRTUAL MACHINE with EC2 (First option).

Here you have two options, one is Quick Launch an EC2 Instance and second is Advanced EC2 Launch instance wizard.
- For Ubuntu or Windows – Go with Quick Launch.
- For Kali Linux – Go with Advanced EC2 Launch.

Here we selected QUICK Launch an EC2 Instance.

Just fill out the instance name and select an OS which you need, here we selected UBUNTU 14.04 LTS.

Further you need to select the instance type, which is t2.micro because this is the only instance which is eligible for FREE TIER but you can also look out for other instances by clicking on EDIT link shown on right side.

Within 1-2 minute, you instance will be ready with UBUNTU Machine along with free public IP.


For Kali Linux, you need to click on “Advanced EC2 Launch Instance Wizard“.

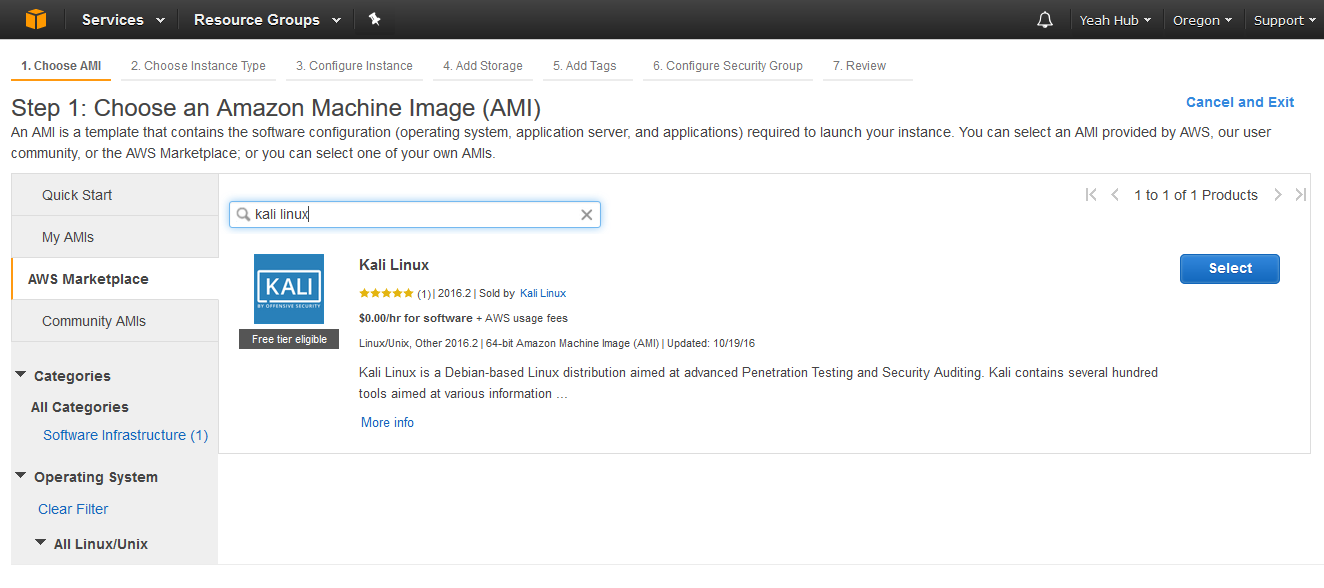
In next screen, go to AWS Marketplace, and search KALI LIUX (By offensive Security). This AMI (Amazon Machine Image) is free tier eligible for 12 months.

In second step, choose an Instance Type, there are so many free tier instances are there, so we selected t2.micro instance which includes 1GB RAM. If you need more RAM and more storage, you can select those too but they will definitely charge for higher configuration.

Just click on “Review and Launch” in next step.

In next, you can even generate new key pair for logging into AWS CONSOLE or you can also go with existing key pair which we generate while configuring UBUNTU Machine.

Within 2-3 minutes, your Kali Linux VM Machine will be ready and you can see your all instances in your dashboard link. Now the next step is to login into this AWS machine with the help of SSH.
So you are done configuring with Kali Linux. Now you need two tools for logging into console:-
- PuTTygen (For converting AWS Private Key into PuTTY format)
- PuTTy (SSH Client)
Although PuTTy doesn’t support AWS generated Key Pair so you have to convert this AWS key pair into PuTTy format with the help of PuTTygen Tool which you can download from this link.
Open PuTTygen Tool and load the downloaded private key file and select the RSA as generation method and click on “SAVE PRIVATE KEY“. You can also generate private key with extra layer security by putting KEY PASSPHRASE.

Now open PuTTy tool, and load that newly generated private key under Auth Category and open the SSH Console with user “ec2-user”

Here you can see the most awaiting terminal with KALI LINUX with root user 🙂

Please note, this is the minimal version of KALI LINUX with less tools, to use it further or update it to latest version, you’ve to follow these steps further,
sudo su –
cat << EOF > /etc/apt/sources.list
deb http://http.kali.org/kali sana main non-free contrib
deb http://security.kali.org/kali-security/ sana/updates main contrib non-free
EOF
apt-key adv — keyserver hkp://keys.gnupg.net — recv-keys 7D8D0BF6
apt-get update
apt-get dist-upgrade
Explanation –
- sudo -s will elevate you to root
- cat << EOF > /etc/apt/sources.lst will update package repository list
- apt-key will add an updated package signing key to the apt keyring.
- apt-get update and apt-get dist-upgrade will update package list and upgrade the kali distro to version 2.
Now you have two options, either you can install kali linux full tools by typing this command “apt-get install kali-linux-full” or you can also install top 10 tools by typing this command “apt-get install kali-linux-top10“.
In next article, we’ll discuss about getting VNC over SSH so that you’ll get graphical access of your Kali Linux VM Machine. For GUI access, you need to install some packages into your Kali Linux with PuTTy tool.
[#] sudo apt-get install xfce4 xfce4-goodies tightvncserver
[#] apt-get install gnome-core kali-defaults kali-root-login desktop-base
To run Metasploit, you need to initialize a Metasploit Database and then start the metasploit console by typing these commands:
sudo /etc/init.d/postgresql start
sudo msfdb init
sudo msfconsole
For more info about Metasploit Framework, please follow this tutorial.
You may also like:- Top 6 Advanced Techniques in Penetration Testing
- Top 4 Advanced Metasploit Techniques for Penetration Testers
- Exploit Writing for Beginners – A Step-by-Step Guide
- 15 Essential Windows Command Prompt Commands for Everyday Use
- Most Common DNS Record Types and Their Roles
- Top Skills Needed to Become a Cybersecurity Analyst
- Mastering Windows Management with WMIC Commands – Top 20 Examples
- Edit and Compile Code with the Best 5 Code Editors
- 50+ Top DevSecOps Tools You Need To Know
- Learn How to Add Proxy and Multiple Accounts in MoreLogin


