The Internet can bring with it a great deal of undesirable traffic, including hackers, spam bots, spyware and more.
EvilLimiter: A tool to limit the bandwidth (upload/download) of devices connected to your network without physical or administrative access. It employs ARP spoofing and traffic shaping to throttle the bandwidth of hosts on the network.
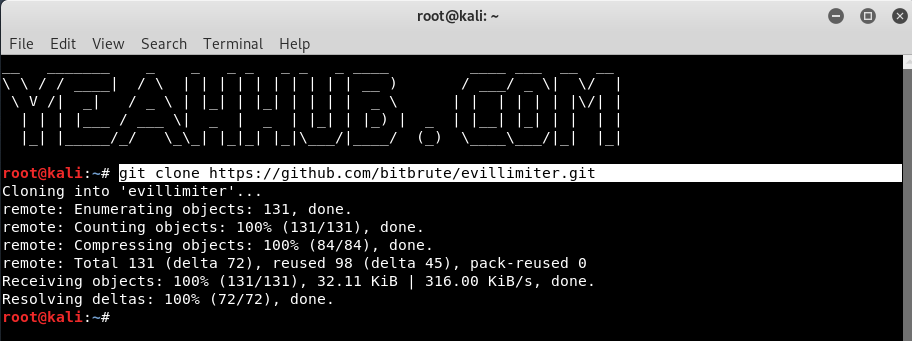
In first step, you need to clone the Evil Limiter repository from Github by using git command as shown below:
Command: git clone https://github.com/bitbrute/evillimiter.git
Next to install, type the following command in your terminal.
Command: sudo python3 setup.py install
Type evillimiter or python3 bin/evillimiter to run the tool which shows a welcome screen as shown below:
EvilLimiter will automatically fetch all the required information like Network Interface, Gateway IP Address, Gateway Mac Address and Netmask Address etc.
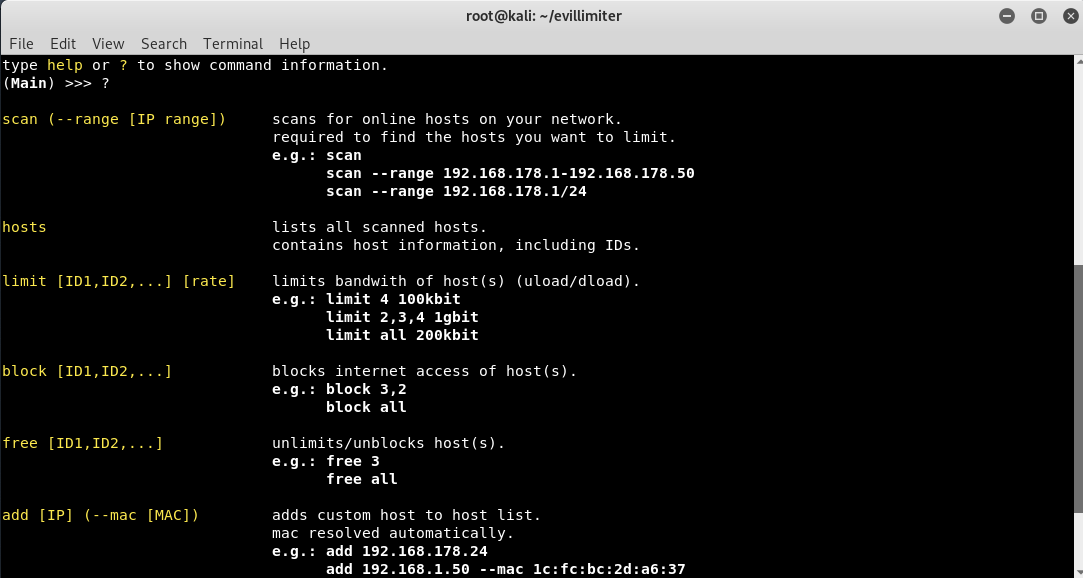
You can explore more functionality of Evil Limiter by looking through the menu system and checking out the available commands. To do so, type a question mark ( ? )in the terminal to pull up the help page.
Host discovery, the process of determining what systems on a network are up and listening, is often the first step in a hostile network scanning action.
To do this, type “scan” command which will automatically filters out all alive hosts in your same network.
Basically, there are two protocols which are most commonly used for host discovery: Address Resolution Protocol (ARP) scans and several types of Internet Control Message Protocol (ICMP) scans.
You can even pass an optional flag to the scan command which is range which will help you to specify the range of ip addresses you want to scan like this
Command: scan –range 10.228.1.1-10.228.1.254
Which will scan a total of 254 hosts from 10.228.1.1 to 10.228.1.254
As you can see that, 92 hosts are alive in our network and to view more information about alive hosts, type “hosts” command which will further displays all IP Address and MAC Address respectively.
Now you know the hosts on your network and now you should know which host you wanna block or limit based on the mac address of the host. Remember the host id of the host that you want to block or limit bandwidth of and lets do the magic.
Now to block a particular IP or Host from using the internet access, type the following command “block <Number>” followed by Host ID which instantly cut off all the internet connection wrt to that IP address within few seconds.
And in case, if you want to uncut or retrieve the internet connection, the command is “free <Number>“.
Instead of blocking or allowing the host, if you just want to limit his internet bandwidth we can do just that by using the limit command followed by the host id and then the bandwidth that we want to allocate to that particular host like this:
There are so many other open source tools are available which do the same process as EvilLimiter do:
Conclusion:
One thing to keep in mind when using Evil Limiter is that ARP spoofing may also exposes your MAC address, so using this tool on a network is effectively telling everyone that your MAC address is the router. That leaves your MAC address in the ARP cache of every machine you’re targeting, so make sure to spoof your MAC address before using this tool if you don’t want to be leaving your machine’s fingerprints all over the network.
We hope you enjoyed this article to using Evil Limiter! If you have any questions about this tutorial on ARP spoofing, leave a comment below, and feel free to contact us at yeahhub@gmail.com or reach us on Twitter @yeahhub.
You may also like:- Top 6 Advanced Techniques in Penetration Testing
- Top 4 Advanced Metasploit Techniques for Penetration Testers
- Exploit Writing for Beginners – A Step-by-Step Guide
- 15 Essential Windows Command Prompt Commands for Everyday Use
- Most Common DNS Record Types and Their Roles
- Top Skills Needed to Become a Cybersecurity Analyst
- Mastering Windows Management with WMIC Commands – Top 20 Examples
- Edit and Compile Code with the Best 5 Code Editors
- 50+ Top DevSecOps Tools You Need To Know
- Learn How to Add Proxy and Multiple Accounts in MoreLogin


